문서 편집툴
Visual Studio Code
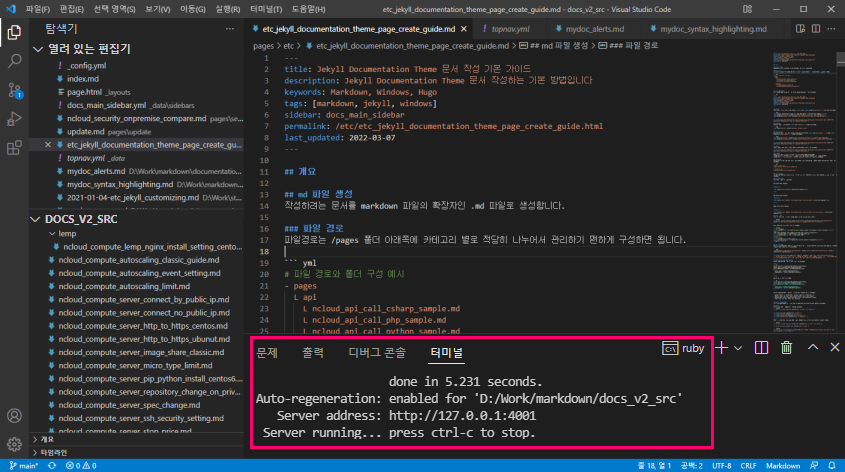
Windows에서 Jekyll 문서를 편집하는 경우에는 Command 창을 열어서 로컬 사이트를 실행하거나 빌드하고, 오류가 발생하면 실시간으로 나타나는 오류 메시지를 확인하면서 작업하게 됩니다.
이때 문서 편집툴과 Command 창을 별도로 띄워놓고 확인하는 것이 불편한데 Visual Studio Code를 사용하면 아래 스샷처럼, 문서 편집화면과 터미널 창을 함께 보면서 작업 가능해서 무척 편리합니다.
md 파일 생성
작성하려는 문서를 markdown 파일의 확장자인 .md 파일로 생성합니다.
파일 경로
파일경로는 /pages 폴더 아래쪽에 카테고리 별로 적당히 나누어서 관리하기 편하게 구성하면 됩니다.
# 파일 경로와 폴더 구성 예시
- pages
  L api
    L ncloud_api_call_csharp_sample.md
    L ncloud_api_call_php_sample.md
    L ncloud_api_call_python_sample.md

  L database
    L ncloud_database_compare.md
    L ncloud_database_mysql_auto_backup.md
문서 속성 설정
문서 상단에 아래 예시와 같은 각 문서의 속성을 설정하는 부분이 있습니다.
---
title: Jekyll Documentation Theme 문서 작성 기본 가이드
description: Jekyll Documentation Theme 문서 작성하는 기본 방법입니다
keywords: Markdown, Windows, Hugo
tags: [markdown, jekyll, windows]
sidebar: docs_main_sidebar
permalink: /etc/etc_jekyll_documentation_theme_page_create_guide.html
last_updated: 2022-03-07
---
title
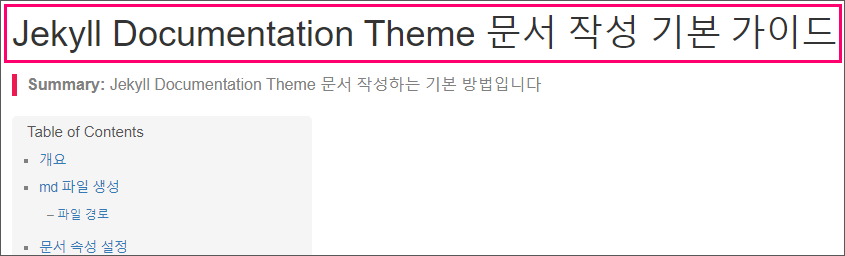
title 항목은 문서 제목과 최종 html의 <title>태그, <meta property=”og:title” /> 태그 등에 사용됩니다.
<title>Jekyll Documentation Theme 문서 작성 기본 가이드 | 써드아이시스템 기술문서</title>
<meta property="og:title" content="Jekyll Documentation Theme 문서 작성 기본 가이드" />
<meta property="twitter:title" content="Jekyll Documentation Theme 문서 작성 기본 가이드" />
keywords
keywords 항목은 최종 html의 <meta name=”keywords” > 태그에 사용됩니다.
<meta name="keywords" content="Markdown, Windows, Hugo">
description
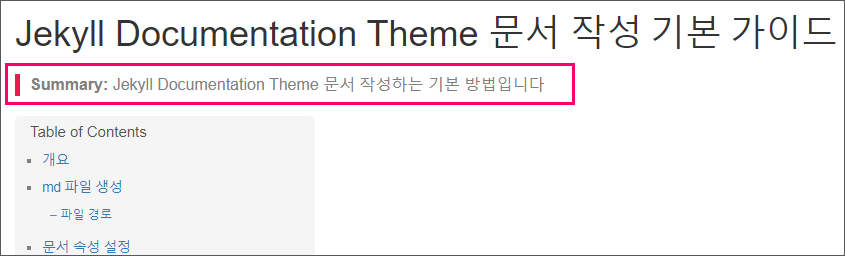
description 항목은 문서 요약 내용인 summary와 최종 html의 <meta name=”description” /> 태그와 <meta property=”og:description” /> 태그에 사용됩니다.
<meta name="description" content="Jekyll Documentation Theme 문서 작성하는 기본 방법입니다">
<meta property="og:description" content="Jekyll Documentation Theme 문서 작성하는 기본 방법입니다" />
tags
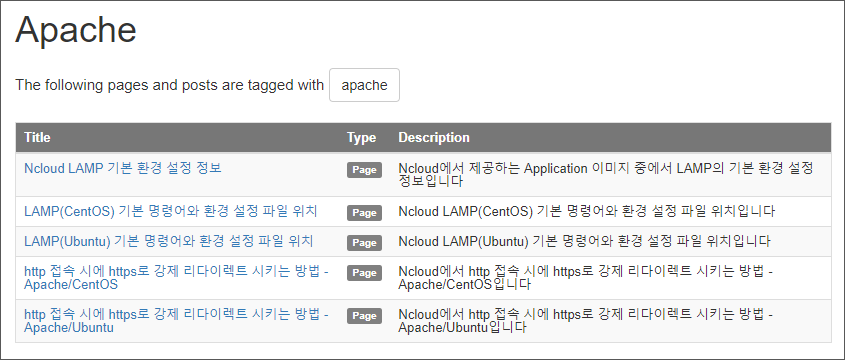
tags를 설정해 두면 동일한 tag를 가진 문서들을 모아서 함께 볼 수 있습니다.
sidebar
전체 문서를 카테고리 별로 표시하는 왼쪽 사이드바의 이름을 설정합니다.
경우에 따라서는 사이드바를 여러 개 만들어서 문서 성격에 따라 다르게 표시할 수도 있습니다.
sidebar 파일은 /_data/sidebars/ 폴더에 docs_main_sidebar.yml 형식으로 있습니다.
permalink
permalink는 문서의 최종 html 페이지 URL 입니다. md 파일의 위치와 관계없이 원하는 형태의 URL로 설정할 수 있습니다.
# md 파일 위치 예시
/pages/compute/server/server_compare.md

# permalink 예시
/compute/compute_server_compare.html
last_updated
문서의 최종 수정일을 뜻하는 것으로 날짜 기준으로 최근 업데이트된 문서를 정렬한다거나 여러 가지로 사용할 수 있습니다.
목차 레벨 설정
목차 레벨은 3가지로 구분됩니다.
## Second-level heading
Result:
Second-level heading
### Third-level heading
Result:
Third-level heading
#### Fourth-level heading
Result:
Fourth-level heading
이미지 설정
이미지는 이미지에 대한 html 태그가 설정된 파일을 include 하게 됩니다.
{% include image.html file="etc/etc_jekyll_documentation_theme_page_create_guide_03.png" width="845" alt="Jekyll Documentation Theme 문서 작성하는 기본 방법" %}
실제 image.html 파일 내용은 다음과 같습니다.
<figure>
{% if {{include.url}} %}<a class="no_icon" target="_blank" rel="noopener" href="{{include.url}}">{% endif %}
<img class="docimage" src="/images/{{include.file}}" alt="{{include.alt}}"
{% if {{include.width}} %}style="width: {{include.width}}px;
{% if {{include.width >= '850'}} %}max-width: 100%
{% endif %}"
{% endif %} />
{% if {{include.url}} %}</a>{% endif %}
{% if {{include.caption}} %}<figcaption>{{include.caption}}</figcaption>{% endif %}
</figure>
URL 링크 설정
URL 링크는 markdown에서 기본으로 제공되는 형식이 있지만 target 설정이나 word-break 등의 스타일을 적용하기 불편해서 html 태그를 그대로 사용합니다.
<a href="https://rubyinstaller.org/downloads/" target="_blank" style="word-break:break-all;">https://rubyinstaller.org/downloads/</a>
Code Syntax highlighting 설정
Syntax highlighting은 다음과 같이 적용할 수 있습니다.
``` c#
byte[] hmac_key = Encoding.UTF8.GetBytes(ncpSecretKey);
byte[] bytes = Encoding.UTF8.GetBytes(message);
using (HMACSHA256 sha256 = new HMACSHA256(hmac_key))
{
	byte[] hash = sha256.ComputeHash(bytes);
	msgSignature = Convert.ToBase64String(hash);
}
```
결과는 다음과 같이 표시됩니다.
byte[] hmac_key = Encoding.UTF8.GetBytes(ncpSecretKey);
byte[] bytes = Encoding.UTF8.GetBytes(message);
using (HMACSHA256 sha256 = new HMACSHA256(hmac_key))
{
	byte[] hash = sha256.ComputeHash(bytes);
	msgSignature = Convert.ToBase64String(hash);
}
Syntax highlighting이 지원되는 대표적인 형식 리스트는 다음과 같습니다.
- apache, batch, c, config(conf), console, cpp(c++), csharp(c#), css
- docker, email, go, html, java, javascript(js), json, jsp, liquid
- markdown(md), nginx, objective_c(objc), perl, php, powershell, python
- ruby, scss, sql, ssh, swift, xml, yml(yml)
Alert, CallOut 설정
문서 내용 중에 강조나 경고, Tip 등을 표시하기 위해 Alert이나 CallOut 기능을 사용합니다.
Alerts
Alerts 사용 방법은 아래와 같고 4종류가 있습니다.
{% include note.html content="This is note." %}
그리고, 앞쪽의 Note, Tip 등을 다른 글자로 바꾸려면 다음과 같이 title 항목을 적용하면 됩니다.
{% include note.html title="제목" content="This is note." %}
{% include warning.html title="ERROR 1227 (42000)" content="Access denied; you need (at least one) the SUPER..." %}
CallOut Version-1
기본으로 제공되는 CallOut Version-1은 다음과 같이 사용합니다.
{% include callout_v2.html type="danger" content="This is my **danger** type callout" %}
사용 가능한 종류는 다음과 같습니다.
CallOut Version-2
기본으로 제공되는 Version-1에서 스타일을 변경한 CallOut Version-2는 다음과 같이 level 속성도 추가해서 사용합니다. level의 기본 값은 3입니다.
{% include callout_v2.html type="danger" level="3" content="This is my **danger** type callout version-2" %}
사이드바 설정
제일 중요한 사이드바는 /_data/sidebars/docs_main_sidebar.yml 파일이며 다음과 같이 설정합니다.
여기서 주의해야 할 것은 들여쓰기 간격이 일치해야 오류가 발생하지 않습니다.
- title : 사이드바에 표시되는 제목입니다. 너무 길 경우 적당히 줄이는 것을 추천합니다.
- url : 문서 url 전체 경로입니다.
- title: 서버 접속 방법(Linux) - 공인IP 없을 때
  url: /compute/ncloud_compute_server_connect_no_public_ip.html
  output: web
SubFolder 등이 포함된 전체적인 구조는 다음과 같습니다.
entries:
- title: sidebar
  product: Technical Documentation
  version:
  folders:

  - title: Compute
    icon: fa-solid fa-server
    url: /compute/ncloud_compute_server_connect_no_public_ip.html
    output: web
    folderitems:

    - title: 서버 접속 방법(Linux) - 공인IP 없을 때
      url: /compute/ncloud_compute_server_connect_no_public_ip.html
      output: web

      subfolders:
      - title: Cloud Functions
        output: web
        subfolderitems:

        - title: Cloud Functions Action을 cmd에서 C#으로 작성하기
          url: /compute/ncloud_compute_cloud_functions_dotnet_csharp_cmd.html
          output: web

  - title: Networking
    icon: fas fa-network-wired
    url: /networking/ncloud_networking_service_port_info.html
    output: web
    folderitems:

    - title: 주요 서비스 포트(Port) 정보
      url: /networking/ncloud_networking_service_port_info.html
      output: web

  - title: Tag archives
    icon: fas fa-file-archive
    url: /tag/tag_archives_overview.html
    output: web
    folderitems:

    - title: Tag archives overview
      url: /tag/tag_archives_overview.html
      output: web

      subfolders:
      - title: Tag archive pages
        output: web
        subfolderitems:

        - title: Classic pages
          url: /tag/tag_classic.html
          output: web
tag 설정
tag를 표시하기 위해서는 몇가지 단계를 거쳐야 합니다.
- 문서 속성 설정에 tag 정보 추가하기
- 허용 tag list 파일에 추가하기
- tag 문서 추가하기
- 사이드바에 추가하기
문서 속성 설정에 tag 정보 추가
이 내용은 위에서 이미 살펴본 내용입니다. 문서 상단 속성 설정에 추가하면 됩니다.
tags: [markdown, jekyll, windows]
허용 tag list 파일에 추가
/_data/tags.yml 파일에 tag를 추가합니다.
allowed-tags:
  - account
  - acg
  - analytics
tag 문서 추가
/tags/ 폴더에 tag_account.md처럼 문서를 작성합니다.
문서는 다음과 같이 구성됩니다. title, tagName, permalink 이렇게 3가지 정보만 설정하면 됩니다.
title: "Account"
tagName: account
search: exclude
permalink: /tag/tag_account.html
sidebar: docs_main_sidebar
folder: tags
사이드바에 추가
사이드바 /_data/sidebars/docs_main_sidebar.yml 파일에 추가해줍니다.
- title: Account pages
  url: /tag/tag_account.html
  output: web
위치는 아래쪽에 아래와 같은 구성으로 되어있습니다.
- title: Tag archives
    icon: fas fa-file-archive
    url: /tag/tag_archives_overview.html
    output: web
    folderitems:

    - title: Tag archives overview
      url: /tag/tag_archives_overview.html
      output: web

      subfolders:
      - title: Tag archive pages
        output: web
        subfolderitems:

        - title: Classic pages
          url: /tag/tag_classic.html
          output: web
Top 메뉴 설정
상단 네비게이션 메뉴는 /_data/topnav.yml 파일에서 설정할 수 있습니다.
- url: 내부 페이지 링크
- external_url : 외부 사이트 링크
topnav:
- title: Topnav
  items:
    - title: Update
      url: /update/update.html
    - title: News
      url: /news/news.html
    - title: FAQ
      url: /faq/faq.html
    - title: Tag
      url: /tag/tag_archives_overview.html
    - title: Company
      external_url: https://3rdeyesys.com/
    - title: 1:1 문의하기
      external_url: https://www.3rdeyesys.com/question/